Thursday, February 9, 2012

Valentine's Day Eyes Looks 1 & 2

I am back already, bringing a couple eye looks in the Valentine's Day spirit :) I have two looks here. One is bold and bright, the soft and shimmery. Hope you like!
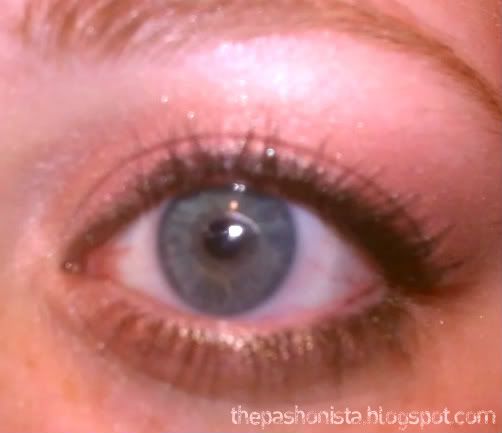
BOLD AND BRIGHT

I loved this bright look that I did. On a normal basis, I would not wear this, because I usually stick to natural. I just thought this was so fun and I have had the bright pink/red color for so long I was so eager to use it.
 
Products used
Urban Decay Primer Potion
Lid and crease: a shimmer baby pink from an Ulta palette.
Crease,outer "v", and lower lash line: Medusa Makeup(bought from Torrid) in Electro Red. It is the reddest shadow I have and although the camera did not do a good job of picking it up, it has a lot of glitter in it. 
Above crease: mark. shadow in Fairy Dust(light shimmer pink)
Brow highlight: mark. shadow in Cushy(light shimmer cream)
Eyeliner: AVON Perfect Wear Eyewriter(liquid) in Evening Black
Tightline and waterline: AVON Ultra Luxury eye liner(pencil) in Black
Mascara: Rimmel London Glam'Eyes in Black
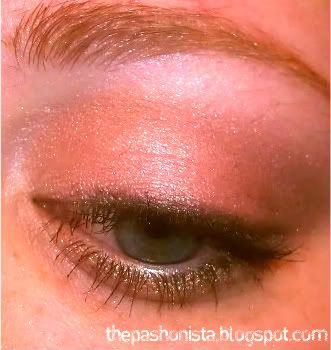
 

SOFT AND SHIMMERY

This look is definitely what I define as more "wearable". It is a much softer look that would look good on anyone.

Products used:
Urban Decay Primer Potion
All over from lid to brow bone: elf cream shadow in a 6 shadow palette(light pink)
Lid: Urban Decay Half Baked from Naked Palette. On top of that is a mark. shadow from the Pinks for Eyes palette(a cool mauve)
Inner corner: from mark. Pinks for Eyes palette(cool light pink) and Foxy from Naked 2 palette
Crease: Urban Decay Tease from Naked 2 palette
Brow highlight: Urban Decay Foxy from Naked 2 palette
Upper lash line: Urban Decay Creep from Naked palette
Lower lash line: Urban Decay Half Baked and Creep from Naked palette
Mascara: Benefit Bad gal Lash


 I had fun with these and there shall be more to come! Next up is my next nail look :)

Wednesday, February 8, 2012

Valentine's Day Nails: Hugs and Kisses

Hello there! Here is my second look for Valentine's Day nails. I did these on my dear friend Demi's nails. They would have been a nightmare to do on my own. Plus, I knew that she would love the look and I love doing her nails, so win win :) I saw a video of someone doing a similar look on her own nails...she must be ambidextrous. I see no other way!

This is a close up of one of the nails. As you can see, I wrote X's and O's, alternating with hearts and dots. Each nail on average took about 7-10 minutes. One nail, the thumb in particular, took me forever! Demi asked if I wanted to know the time, and I did not. It was very frustrating at that point. I drew each of the letter, hearts and dots with a toothpick and later with a dotting tool with a very small tip. The trick is to not overload with tip with polish, I did make this mistake several times with the O. That was the hardest part. When the O started to close in, I just let it dry and put a dot in the middle with the base color I used.


The colors I used..............OPI Base Coat(not pictured), OPI Ate Berries in the Canaries, Orly Lollipop for the hearts, a pink Ulta color for the dots, and Kiss Nail Art Paint for the X's and O's
FINAL PRODUCT!! Only took me two hours. OY! I am proud of this, considering I have never done anything so detailed. The more I practice the better I do :)


I want to thank Demi for letting me post this! And to thank her for her patience during this process. It was fun to do :)

I will have another look coming soon! 

Friday, February 3, 2012

Valentine's Day Nails: Simple Polkadots

Hey loves! Valentine's Day is approaching! I know not everyone is excited about this, but I do not think it needs to be about love with a significant other. It can be fun for other reasons and that is makeup and nails! 

So I decided I want to do two nail looks a week up until Valentine's Day. It is funny that about a year ago I did some V-Day nails as my first attempt at nail art, and simply fell in love. I also thought it would be to start showing the things I am capable of doing(I do not have many supplies, just a lot of polish). I keep it simple, but cute :) I hope you like what I have to show you.

I know this really is simple and maybe the only thing that says Valentine's Day is the colors. But I do enjoy doing polka dots and thought this was a cute look. To add the dots, I used a dotting tool. Sometimes when I do dots, I like them to be random sizes and placed randomly as well. In this case, I wanted it to look more uniform.

These are the polishes I used from start to finish. I used OPI Base Coat. Then on all my nails except for the ring and thumb, I used Orly's Pink Chocolate, which has a cream finish. On the ring and thumb I used Orly's Cotton Candy, also a cream finish. The dots were from Kiss Nail Art Paint in White, used with a dotting tool. I finished it off with OPI Top Coat.
 I hope you enjoy this design. I recommend it if you feel like you cannot do something too complicated. It really is so easy.

I cannot wait to show you my next look in just a few days!
XOXO